This year (2005) is the 65th anniversary of the Battle of Britain. I guess it was good timing that saw me meeting up with Prof. John at Shrivenham, together with some Granada TV programme developers. Turned out that they were making a film in the series "Battlefield Detectives," to be shown on Channel 4. They had come to Shrivenham because they believed that that RAF Fighter Command at that time was an early example of systems engineering, so where better to find out how it was done?
To be honest, it wasn't obvious to me at first that there was much relationship between the Battle of Britain and systems engineering. After all, the term 'systems engineering' wasn't even invented until 1941. Still, anything for a challenge – but, first a recap.
The Battle of Britain was at its most fierce, and most crucial, during the periods 8th to 18th of August, the first phase and 19th August to 5th September, the second phase. During these two crucial phases, the strategy of the German Luftwaffe was to crush the UK's air defence, so that the Germans could then proceed unhindered with bombing and invasion: Operation Sea Lion they called it. To achieve their aim, they attacked ground radars, RAF fighters in the air and on the ground, and airfields, with their fuel and ammunition dumps, aircraft factories...
Under Air Marshall Hugh ('Stuffy') Dowding's direction, RAF Fighter Command had set up a new command and control system, starting back in 1936. The C2 system used the new Chain Home and Chain Home radars as its eyes to get advanced warning of German raids. These early radars did not work well over the land, however, and the Royal Observer Corps "told" Fighter Command about enemy and friendly aircraft over England. The ROC was also invaluable in providing raid-size estimates - at which the fledgling radars were none too accurate.

The C2 Cycle: sequences and timings for Command and Control of RAF Fighter Defences
No. 11 Group of Fighter Command covered the south and south east of England, and it was here that the aerial combat was at its fiercest. Both sides lost heavily, and both sides tried to make up for their losses by bringing in new aircraft and new aircrews. On August 18th, for instance, the Luftwaffe lost some 69 aircraft to the RAF's 39 - 31 of these were lost in the air, and 8 on the ground.
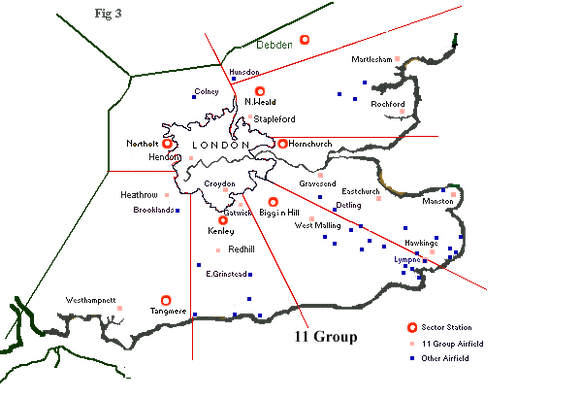
No 11 Group Fighter Command Deployment, 1940
The German High Command had expected the air defence of the UK to be crushed within a few days only. Faced with such stern, even desperate, resistance, they switched their strategy to night bombing of our major cities and manufacturing centres. Several questions remain, however:
1. How long could Fighter Command have lasted if the Luftwaffe had continued to attack the RAF bases and radars, instead of switching to bombing London and other cities?
2. Can the Battle of Britain be reasonably classified as a "win" for the UK, or not?
And there is a third question. At the time, there was fierce debate at high level about Fighter Command's tactics. AVM Keith Parks, AOC 11 Group, did not throw everything he had at each German raid. Instead he sent up only a few of his 20-21 squadrons of Hurricanes and Spitfires, to harry the Luftwaffe formations of bombers with fighter escorts. The idea was to break up the formations, deterring them, and enabling stragglers to be picked off. He similarly resisted the temptation to take on roving bands of LW Bf109s, choosing instead to conserve his fighter forces for the offensives yet to come.
Trafford Leigh-Mallory, AOC 12 Gp., supported by the redoubtable Douglas Bader, advocated the "Big Wing." This would necessitate gathering together as many of FC's fighters as possible and going out en masse to meet, and hopefully destroy, the raiding Luftwaffe in one major air battle. The Big Wing concept carried risks: inevitably many casualties would be incurred, and the Big Wing would be vulnerable on the ground, with all the fighters gathered at one forward base.
So, the third question is:
3. Was the strategy employed by Dowding and Parks, of conserving RAF fighter aircraft resources in anticipation of prolonged activities better, or worse, than the Big Wing concept - which would have contributed most in the long run...?
These questions were to be addressed within a space of no more than 1 month. In a moment of weakness I offered to build a dynamic simulation of the Battle of Britain - talk about "fools rush in!"
How to proceed? I started by looking up all the statistics I could find on numbers of aircraft, daily casualty statistics, locations of squadrons, radars, etc., etc. In this I was greatly helped by Stephen Bungay, something of an authority on the Battle of Britain. Naturally, he was involved with the making of the TV programme.
The Simulation
Then came the simulation model, which was made up from a number of interlocking parts:
- Some 20 fighter squadrons of No 11 Group, totalling about 320 Spitfires and Hurricanes, together with pilots, ground maintenance, repair, refuelling, rearming, etc.
- Chain Home Radars
- RAF Sector stations
- Pilot Training facilities providing a stream of new pilots
- Fighter manufacturing facilities
- Luftwaffe squadrons in France with some 1200 fighters and bombers
- And, famously, the typical English summer weather
The whole lot fitted together after the fashion of the diagram. Weather was a major factor, as the Luftwaffe needed clear conditions for bombing. Happily, the weather was not too obliging in that respect.

The simulation presents an Operations Room in miniature, with a map of SE England. The map showed the various sectors A, B, C, D, E, F and Z, with their respective sector stations, Tangmere, Kenley, Hornchurch, N Weald, Debden and Northolt. To left and right of the map are two columns of switches which alert squadrons, in preparation to meet attacks. Alerted squadrons show a green light on their switches, and a corresponding red light on the map. Graphs at top left and top right show the activity of squadrons and RAF Vs. Luftwaffe losses respectively. The simulation runs for 31 days, during which time the weather may be varied, the squadrons on alert may be varied, and so on. Simulation results are accumulated in the background, and the statistics may be transferred to Microsoft Excel for processing, graphing, etc.
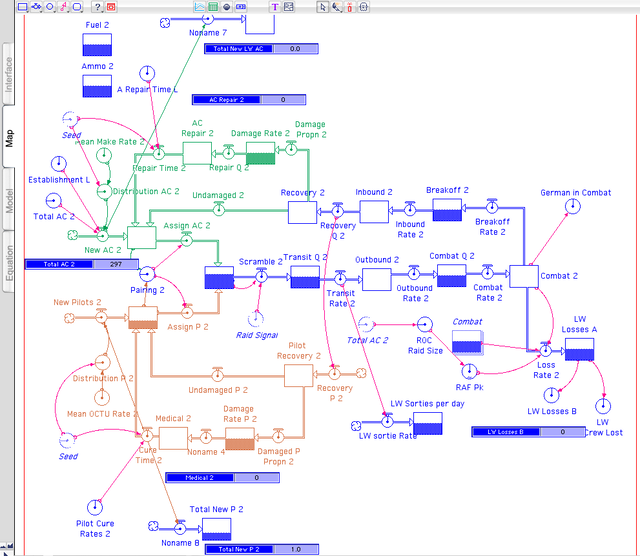
Part of Stella™ simulation in action, showing RAF fighters scrambling, outbound, in combat and recovering, with aircraft damage and crew casualties.
Simulation Results
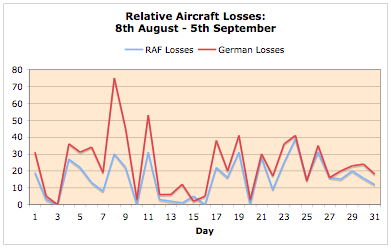
Working with the first month being actuals (i.e. based on known results from the records) and the remaining 5 months being simulated, it is possible to test out the likely results of prolonged combat:

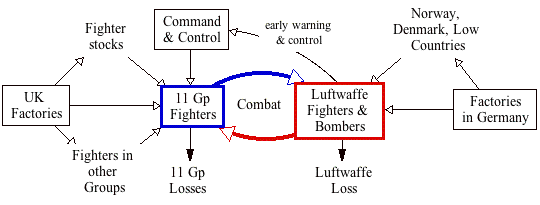
STELLA™ Logistics and Attrition Model. The graph shows RAF fighter numbers in blue and
Luftwaffe aircraft in red, with both parties reinforcing their front line numbers…
Having got the simulation working, the plan was to "tune" it so that it matched the known statistics of aircraft losses from 8th August to 5th September. Once tuned, it would be possible to simulate further months of combat, allowing for changeable weather, re-supplies, etc., and to see how the course of the battle might have gone – had the Luftwaffe continued attacking RAF Fighter Command. (Predicting the, then, future is not really feasible, of course, any more than predicting the future now is possible. The best you can hope for is a SWAG – a scientific wild-arsed guess.)
The known statistics of casualties looked like the trace of a fiddler's elbow:
Tuning the simulation to behave like the known statistics proved impracticable. There was just too much variability, as a phase-plane diagram of the known statistics shows:
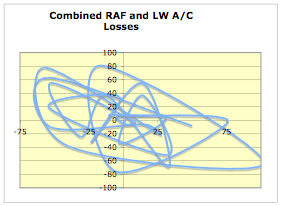
It may be my imagination, but I seem to see the beginnings of a butterfly shape appearing in that chart - suggesting that the real-world situation may have been "on the edge of chaos," to use the popular expression. And the simulation model was also very finely balanced; simply changing random number seeds could result in major changes to simulated casualty results over a 30-day simulated run. (For the technically minded, the time interval, dt, for the simulation was 15 seconds, so 30 days necessitated a fair bit of calculation.)
Force Multiplier Effect
The only way to make the simulation behave like the real world was to drive it: i.e., take on the role of Keith Parks, AOC No. 11 Group, and to adopt somewhat unpredictable tactics. One scheme that made the model correspond to the real world was to send up only two or three squadrons at a time against even quite large raids of Luftwaffe fighters and bombers. The squadrons that were scrambled not only inflicted casualties, but also received them, so they could then be rested, and could wait to receive new aircraft and pilots. Meanwhile a different set of two or three squadrons could be scrambled on successive days, and so on. With some 20 squadrons in the Group, and allowing for weather breaks, it could take ten days or more to complete the cycle.
One key attribute of this tactic, as the simulation showed, was that it limited RAF casualties. If two squadrons were sent up, then the maximum number of fighters at risk was only two squadrons' worth – perhaps 30 fighters. And here was the risk of using the Big Wing. Sure, the RAF could have inflicted great damage on the Luftwaffe with the Big Wing, but only at the expense of great casualties to the RAF. As the Luftwaffe outnumbered the RAF by about four to one, the Luftwaffe could afford the losses – the much smaller RAF fighter force could not. Had the proponents of the Big Wing had their way, No. 11 Group would surely have been wiped out. Or, so the simulation indicated.
And Parks' tactic was possible only because of the Chain Home Radar. Using the radar enabled Parks and his controllers to direct their few squadrons to the point where the enemy attack crossed the southern coast. The radar was, in effect, a Force Multiplier. Without the radar, the RAF would have needed many more squadrons airborne and on patrol, so that some at least would be in the right spot to engage the incoming enemy. With the radar, and much to the surprise of the Luftwaffe, the RAF’s fighter squadrons kept appearing in just the right place at just the right time – much to the puzzlement of the Luftwaffe, who did not know about the Chain Home radar.
Using the radar as his early warning enable Parks, with his tactics of force conservation, to match the Luftwaffe – just. On average, the Luftwaffe lost three aircraft to 11 Group's two. And for downed German crews, the war was over, while downed RAF crews could, with luck, return to base within hours. The situation was, however, finely balanced on a knife-edge.
Using the simulation, it was possible to generate the likely pattern of events over the next few months – had the Luftwaffe not changed its strategy. The weather would have changed, of course, and that had to be allowed for. It was also important to represent the likely behaviour of the then forces. For instance, would the rest of Fighter Command reinforce the diminishing numbers in No.11 Group? Similarly, would the Luftwaffe transfer more aircraft from their operations in Denmark and Holland to bolster their air force in France?
Outcome
The outcome was not quite as expected. Had reinforcements not been allowed on either side, the Lufwaffe would have overrun No. 11 Group in just over two months, according to the simulation. However, with rein-forcements allowed, the situation reversed, and the Luftwaffe effectively ran out of aircraft after some three and a half months. Both figures should be taken with a large pinch of salt, of course. No commander in his right mind would continue attacking until he ran completely out of aircraft and crews. And no defending commander would run himself down to zero aircraft without trying different tactics, either.
Taking stock, then, it seems that – had the Luftwaffe maintained their aim of defeating the RAF, and particularly No. 11 Group - they would most probably have failed or given up.
Was the Battle of Britain a victory for the RAF? Most assuredly: the aggressor was deterred, and Operation Sea Lion never went ahead. That is a victory in anyone's book
And was it systems engineering? Fighter Command, thanks to Dowding had developed a Command & Control System that offered just enough of a Force Multiplier to redress the odds. The Chain Home radar was just good enough, the Control and Reporting System was just fast enough, and the fighters were just quick enough when scrambled to reach height and position as the enemy arrived. These various system parts were coupled together, and their operators trained and retrained until the overall system was just swift enough, and had sufficient capacity, to cope. Coupled with Parks brilliant tactics, No, 11 Group was just able to stem the flow and survive in the process. The whole system, with its many parts, worked as a unified whole - it was created that way, and I guess that it really was systems engineering - of the highest calibre.
Derek Hitchins November 2005